How to Remove Reverb and Room Echo From a Recording
Reverb is your own voice bouncing back, so it can be reduced but not erased. The tools that do it, free to paid.
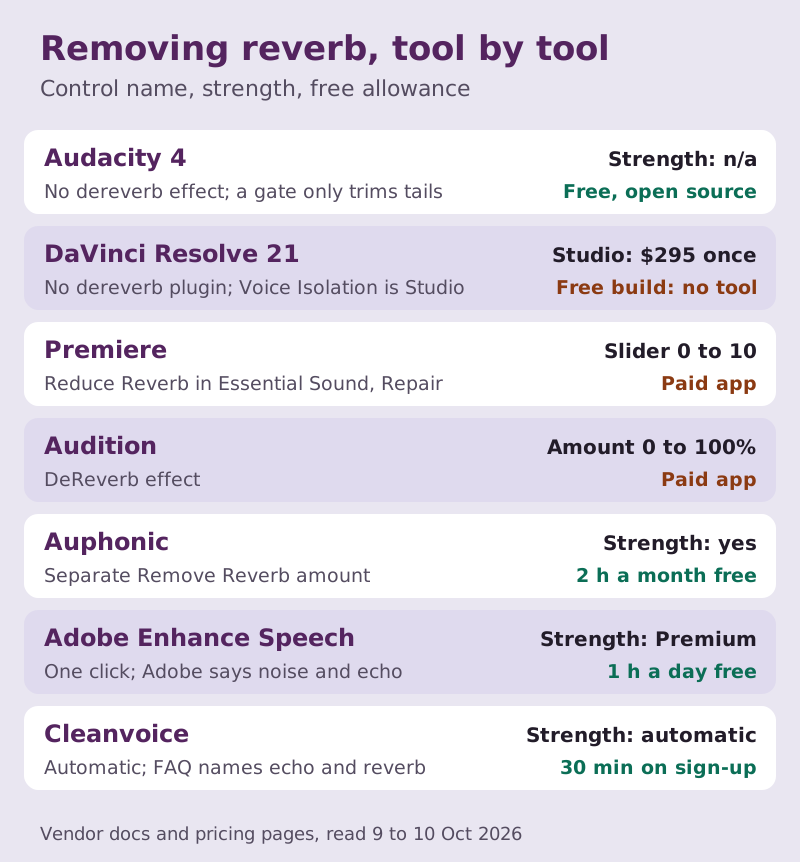
You can reduce reverb in a recording, but you can't erase it the way you can erase a steady hiss. The tools that do it best are trained models: Auphonic's Remove Reverb control (2 hours a month at no cost), Cleanvoice, and Adobe Podcast's Enhance Speech, plus the DeReverb effect in Adobe Audition and Reduce Reverb in Premiere. Audacity and the free build of DaVinci Resolve have no dedicated dereverb tool at all. Expect to turn a cavernous room into a slightly live one, not into a studio.
As with everything on this site, this guide is about a file that already exists. You recorded in a kitchen, a stairwell or an empty office, and the voice is swimming in its own reflections. I'll explain what reverb actually is, set an honest ceiling on what can come out, then walk through the tools from free to paid, with the exact controls checked against each vendor's own documentation on 10 October 2026.
Reverb vs echo vs noise: what you're actually removing
Noise is a separate sound sharing the file with your voice: a fan, traffic, the hum of a fridge. Reverb is your voice itself, arriving a second, third and hundredth time after bouncing off walls, floor, ceiling and windows. Those reflections pile up into a smooth tail that hangs behind every word. Echo is the special case where one reflection arrives late enough and strong enough to be heard as a distinct repeat, the way a shout comes back off a cliff.
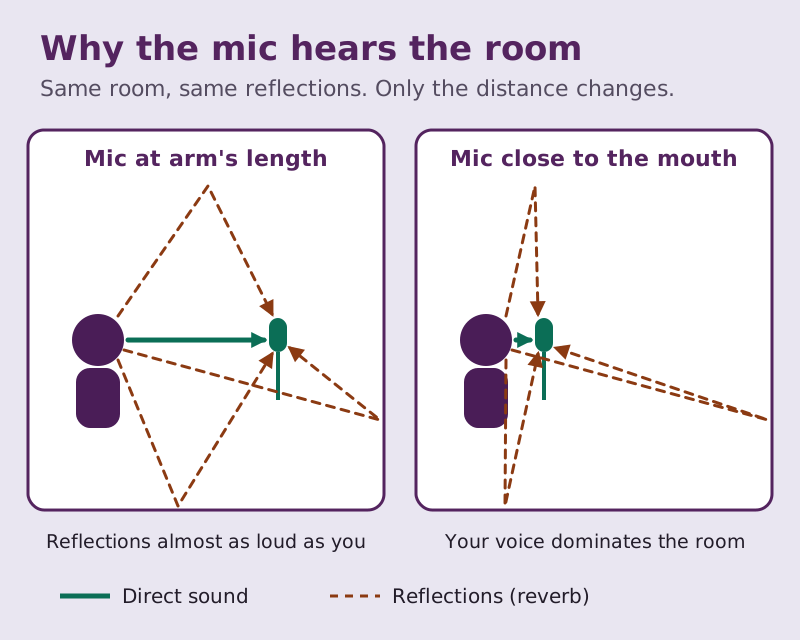
Acousticians measure a room's reverb as RT60: the time it takes a sound to die away to 60 dB below its starting level. That time grows with the size of the room and shrinks as its surfaces absorb more sound. A bare room with hard walls has a long tail; the same room with a sofa, curtains and a rug has a much shorter one. Your microphone hears all of it, and it hears more of the room the further it sits from your mouth.
That last point explains why reverb is so much harder to fix than noise. A classic noise reduction tool, the kind in Audacity or Audition's Noise Reduction effect, learns a profile from a stretch of the file that contains only noise, then subtracts that profile everywhere. Reverb has no such stretch. It only exists while you're speaking and just after, and it shares the same frequencies as your voice because it is your voice. Subtraction tools either miss it or carve chunks out of the speech trying.
Before you start: how much reverb can come out
Dereverb tools work by estimating which part of the signal is the direct voice and which part is the tail, then turning the tail down. The early reflections, the ones that arrive within a few milliseconds of the voice, are tangled up with the speech itself, so no tool can strip them cleanly. What these tools do well is shorten and soften the late tail, the wash that makes a voice sound like it's in a bathroom.
Push any of them too hard and you trade one problem for another. The voice turns hollow, watery or slightly robotic, word endings get clipped, and quiet syllables can vanish. Adobe warns that its DeReverb effect can leave the output quieter than the original, which is why it includes a make-up gain. My rule of thumb: raise the amount until the room stops being the first thing you notice, then back off a little. A trace of room sounds natural. A voice with no room at all sounds processed.
Two practical habits help. Work on a copy, never the original. And if the recording also has steady noise, try a single tool that treats noise and room sound in one pass, such as Auphonic (noise and reverb) or Enhance Speech (noise and echo), before stacking separate effects, because each pass adds its own artefacts. If the noise is a hum or hiss you can name, our guide to hum and hiss covers that part.
Free routes: Audacity, DaVinci Resolve and the online tools
Audacity
Audacity 4 is free and open source, but its Noise Removal and Repair effects are Click Removal, Clip Fix, Noise Gate, Noise Reduction and Repair. None of them is a dereverb. Noise Reduction needs a noise-only sample, which reverb never gives you. The one built-in trick worth knowing is the Noise Gate: set it to pull down the level in the pauses between phrases, and the tail that trails off after each sentence gets shorter. It does nothing to the reverb under the words, and an aggressive gate makes the pauses sound unnaturally dead. For everything else Audacity does well, see our Audacity guide.
DaVinci Resolve
The DaVinci Resolve 21 manual lists no dereverb plugin among its Fairlight FX. The effect named Reverb adds reverb rather than removing it. The Fairlight Noise Reduction plugin is available in the free version, with De-Hiss and De-Rumble presets, but it's built for steady noise, not room sound. The tool most people reach for on roomy dialogue is Voice Isolation, which removes loud unwanted sounds from voice recordings, and that is Studio only: DaVinci Resolve Studio costs $295 as a one-time purchase as of 9 October 2026. Blackmagic doesn't describe Voice Isolation as a dereverb, so treat it as worth a try rather than a promise. Our DaVinci Resolve guide covers the free noise path.
The online tools with a free allowance
This is where the free route gets genuinely useful. Auphonic's free account processes 2 hours of audio a month, and its documentation says its Static Denoiser removes reverb along with steady technical noise, even with music in the mix. With the Static Denoiser, Dynamic Denoiser or Speech Isolation methods, you get a separate Remove Reverb amount, so you can keep a little room if you want it. Adobe Podcast's Enhance Speech is free for up to 1 hour of audio a day; each upload can run to half an hour and 500 MB, with no video and no strength control. Adobe's own description mentions noise and echo; its pages never use the word reverb. Cleanvoice gives new accounts 30 minutes of free credit, and its FAQ says it can remove echo and reverb. Our page on online tools compares their free allowances.
Premiere and Audition: Reduce Reverb and DeReverb
Premiere
In Premiere, select the clip, tag it as Dialogue in the Essential Sound panel, open Repair and tick Reduce Reverb. The slider runs from 0 to 10. Adobe describes reverb as sound waves reflecting off surfaces and blending with the original, and the control as making the audio sound like it comes from one source. Start low, play the loudest sentence in the clip, and raise it one step at a time. Premiere also has Enhance Speech in the same panel, with a Mix Amount slider that blends the enhanced and original audio. On a very roomy clip, Enhance Speech at a reduced mix often sounds more natural than Reduce Reverb at full strength. Our Premiere guide covers the rest of the panel.
Audition
Audition has a dedicated effect: Effects, then Noise Reduction/Restoration, then DeReverb. Adobe says it estimates the reverberation profile and lets you set the amount from 0% to 100%. Five Processing Focus buttons aim the processing at all frequencies, the highs, the highs and lows, the mids, or the lows. Because removing reverb lowers the output level, there is an Output Gain slider and an Auto Gain checkbox to make it up. One detail trips people up: Audition's Essential Sound panel has a Repair section too, but Adobe's documentation lists only Reduce Noise, Reduce Rumble, DeHum and DeEss there, so the reverb tool is the effect, not the panel. More on Audition's noise tools is in our Adobe Audition guide.
Which focus button to use depends on what the room is doing. A boomy, low-frequency wash, typical of a small room with hard walls, responds to the low focus. A bright, splashy tail from tiles or glass responds to the high focus. If you can't tell, start with all frequencies and listen to how the tail changes as you raise the amount.
AI tools: Adobe Enhance, Cleanvoice and Auphonic
The three upload tools all separate speech from everything else with trained models, which is the right approach for reverb. They differ mainly in control. Enhance Speech is one click. Without Premium you can't set its strength, which is exactly the control reverb needs, so the 30-day Premium trial is worth taking if Enhance is your tool. Our Enhance Speech guide explains the strength setting. Auphonic gives you the most control, with separate amounts for noise, reverb and breaths and several denoising methods to choose from. Cleanvoice is automatic and is built around podcast clean-up, so it can also take out filler words in the same pass.
If you need more than the free allowances, Auphonic's paid plans are sold by hours of processing: its smallest recurring plan, S, gives 9 hours a month and cost $11 a month billed yearly, or $13 month to month, before any VAT, when we read its pricing page on 10 October 2026. Recurring hours reset each month and don't roll over, while its one-time credits never expire. Cleanvoice and Adobe Podcast Premium prices didn't display reliably when we checked, so I won't quote them; see each vendor's pricing page.
Next time: record with less room
Every fix above is a compromise, and the better compromise is a recording with less reverb in it to begin with. The single most effective change is distance. Cut the distance from mouth to microphone in half and the direct voice gets much louder while the room stays about the same, so the reverb drops in proportion. A lapel mic or a headset mic beats a camera mic across the room for exactly this reason.
Soft surfaces help next. In the standard published absorption tables, gypsum wallboard and plaster soak up only about a twentieth of the mid-range sound that reaches them and window glass about a tenth, while a medium velour curtain takes in roughly seven tenths. Record in the most furnished room you have, close the curtains, put a rug down, and stay away from bare corners. A wardrobe full of clothes is a famously good vocal booth. Absorbing sound inside the room is a different job from blocking sound coming in from outside, so foam panels won't stop traffic noise, but they do shorten a tail.
Finally, record a few seconds of the room with nobody talking. It won't help a dereverb tool, but if the file also needs noise reduction, that clean stretch gives a profile-based tool something to learn from.
Edge cases
The echo came from a phone or a remote recording
If you recorded a remote guest and their voice comes back as a distinct repeat, that is usually echo from their speakers leaking into their mic, not room reverb. Dereverb tools can soften it but rarely remove it. If you recorded each side separately, use the guest's own local track instead of the mixed one.
There's music under the voice
Most speech-focused tools treat music as something to remove. Auphonic's Static Denoiser is the exception its documentation calls out, because it removes reverb and steady noise while keeping music. Otherwise, clean the voice track before you add the music bed.
Several people in a large hall
A lecture or a panel in a big space is the hardest case: lots of reverb, voices at different distances, and audience noise. Process each speaker's track separately if you have them. If you only have one room mic, aim for intelligible rather than clean, and accept a lighter touch.
The file is already heavily compressed
A low-bitrate MP3 or a voice message has already thrown detail away, and dereverb tools have less to work with. Use the highest-quality copy you can find, and expect more artefacts at the same setting.
Removing reverb: frequently asked questions
How do I remove reverb from audio for free?
Upload it to Auphonic, which processes 2 hours a month on a free account and lets you set a separate Remove Reverb amount, or to Adobe Podcast Enhance Speech, which handles up to an hour a day. Cleanvoice's 30 free minutes on sign-up are another option. Audacity and the free version of DaVinci Resolve have no dereverb effect.
Can Audacity remove reverb?
Not directly. Audacity 4's noise and repair effects don't include a dereverb, and its Noise Reduction learns from a sample of pure noise, which reverb never provides. A gently set Noise Gate can shorten the tail in the pauses between phrases, but it won't touch the reverb under your words.
How do I remove reverb in Premiere?
Select the clip, set it to Dialogue in the Essential Sound panel, open Repair and tick Reduce Reverb, then adjust the 0 to 10 slider. Raise it gradually while listening to the loudest passage. Enhance Speech in the same panel, with its Mix Amount turned down, is worth comparing on very roomy clips.
Is echo the same as reverb?
No. Reverb is a dense wash of reflections that blur into a tail behind each word. Echo is a single reflection that arrives late enough to be heard as a separate repeat. The same tools can soften both, but echo from a remote guest's speakers usually needs a cleaner source track rather than more processing.
Can AI remove reverb completely?
It can remove a lot, but not all of it without side effects. The late tail comes out well; the earliest reflections are tangled up with the voice itself. Pushed to full strength, every tool starts to make the voice sound hollow or processed, so leave a little room in.