How to Remove Background Noise in Adobe Audition
As with every guide on this site: files, not live audio. You bring a recording that already exists; we make it cleaner.
For a steady noise such as hiss, hum or a fan, use the noise print method. Open the file in the Waveform Editor, select half a second or more of noise with no speech in it, and choose Effects > Noise Reduction/Restoration > Capture Noise Print. Then select the range to clean, open Effects > Noise Reduction/Restoration > Noise Reduction, start at about 80% Noise Reduction and 10 dB Reduce By, preview, and apply. For noise that changes as the recording goes on, use Adaptive Noise Reduction instead. If Capture Noise Print is greyed out, you're almost certainly in the Multitrack view or have nothing selected.
Audition has more noise tools than any other app in this library, and most frustration comes from using the right method on the wrong noise. So the first section matches the tool to the problem before any steps.
Effect names and paths checked against Adobe's Audition help (Reduce noise and restore audio, Essential Sound panel) · noise-print work happens in the Waveform Editor · Creative Cloud subscription.
Placeholder players — the real clips drop in at QA (see deploy notes for the file slots).
Which Audition tool for which noise
Adobe files all of these under Effects > Noise Reduction/Restoration, and they split into two families. The offline process effects, Noise Reduction and Hiss Reduction, only exist in the Waveform Editor and change the file when you apply them. The real-time effects, including Adaptive Noise Reduction and Automatic Click Remover, can sit in the Effects Rack and work in the Multitrack Editor too. Adobe's own advice is to reach for the process effects when audio is unusually noisy.
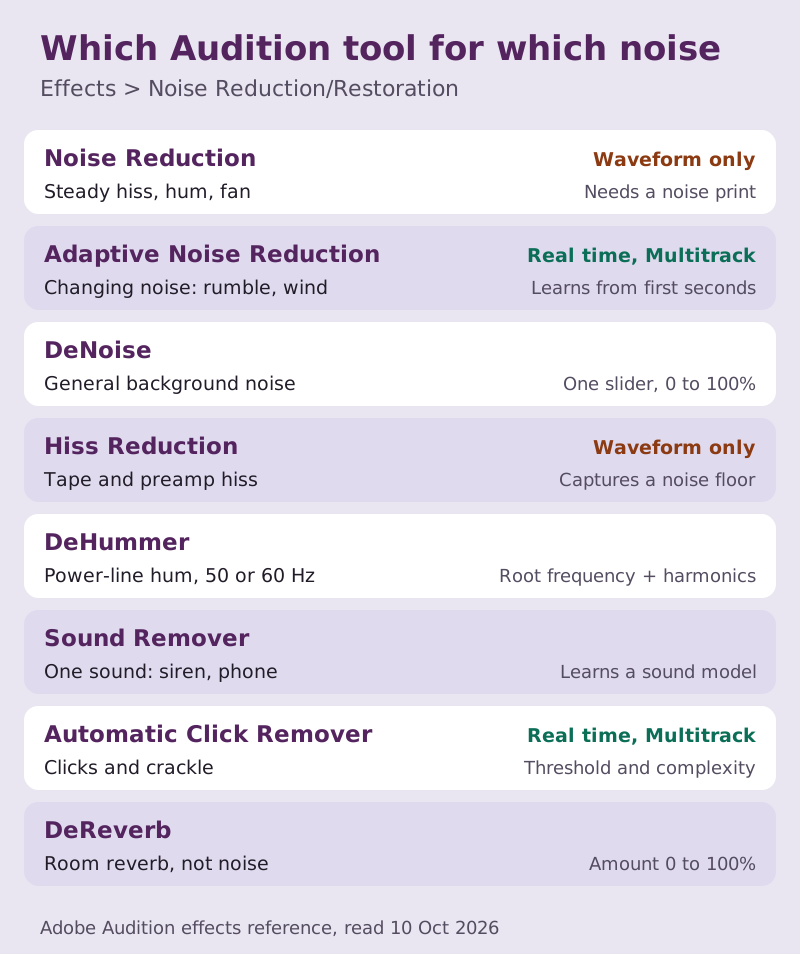
A few rules of thumb fall out of that table:
- Constant hiss, hum or fan noise with a quiet gap somewhere: Noise Reduction with a noise print.
- Noise that drifts, such as traffic, wind or an air conditioner cycling: Adaptive Noise Reduction.
- A quick general clean with one slider: DeNoise.
- Mains hum only: DeHummer, not a noise print (see our hum and hiss guide).
- One intrusive sound you want gone, like a phone or a siren: Sound Remover.
- Room echo: DeReverb, which is a separate problem from noise.
That last point answers one of the most common questions about Audition: "how do I remove a sound from audio?" If you mean one particular sound rather than a background hiss, Sound Remover is built for it. Select a stretch containing only that sound, click Learn Sound Model, and Audition builds a model to find and remove it elsewhere. Adobe ships presets for common intruders such as sirens and ringing mobile phones, and an Enhance for Speech option that takes care not to remove anything resembling speech. For a short sound you can see, such as a cough, a click or a door knock, the Spectral Frequency Display is often quicker. Show it by dragging up the divider below the waveform, draw a box around the sound with the Marquee selection tool, press Delete, and play it back: Adobe's own tutorial notes that Audition softens the edges of the cut so it doesn't sound abrupt. The Spot Healing Brush in the same view does the job by painting over the sound instead of boxing it.
Step 1: capture the noise print
- Open the file in the Waveform Editor. If you're in a multitrack session, open the clip's file there first, because the noise print workflow doesn't exist in Multitrack.
- Find a stretch with only background noise: no breath, no chair creak, no word tail. Adobe asks for at least half a second. The room tone before the first word is usually the best source.
- Select it and choose Effects > Noise Reduction/Restoration > Capture Noise Print. Adobe's shortcut list gives Shift+P for this command.
- Nothing visible changes. Audition has stored a statistical profile of that noise, which it will subtract from the rest of the file.
Why this works: the print records how loud the noise is at each frequency. The cleaner the sample, the more precisely Audition can remove only the noise. A print that caught a breath will try to remove breaths everywhere.
If you clean the same kind of noise often, the Noise Reduction dialog can save the current noise print as an .fft file and load it later. Adobe notes a print only applies to identical sample types, so a 22 kHz mono print won't work on 44 kHz stereo audio.
Step 2: apply Noise Reduction
- Select the range to clean. Most of the time that's the whole file; the dialog also has a Select Entire File button.
- Open Effects > Noise Reduction/Restoration > Noise Reduction.
- Set Noise Reduction to about 80% and Reduce By to 10 dB as a starting pair.
- Preview while it loops, and toggle the effect on and off to compare.
- Tick Output Noise Only for a moment. You should hear only hiss or hum. If you hear words, the settings are eating your voice.
- Apply once the noise drops without the voice turning glassy.
When it fails: the print only describes the noise it sampled. If the background changes partway through, a fridge switching off or rain starting, capture a new print for that section and process it separately. Adobe also warns that a DC offset in the file can make this effect add clicks in quiet passages; run Favorites > Repair DC Offset first if you hear new clicks after processing.
Audition's starting pair, and where it turns to sparkle
Noise Reduction
Reduce by
Capture Noise Print is greyed out: the causes
This is the question the forum threads keep asking, and it has a short list of answers. Work down it in order.
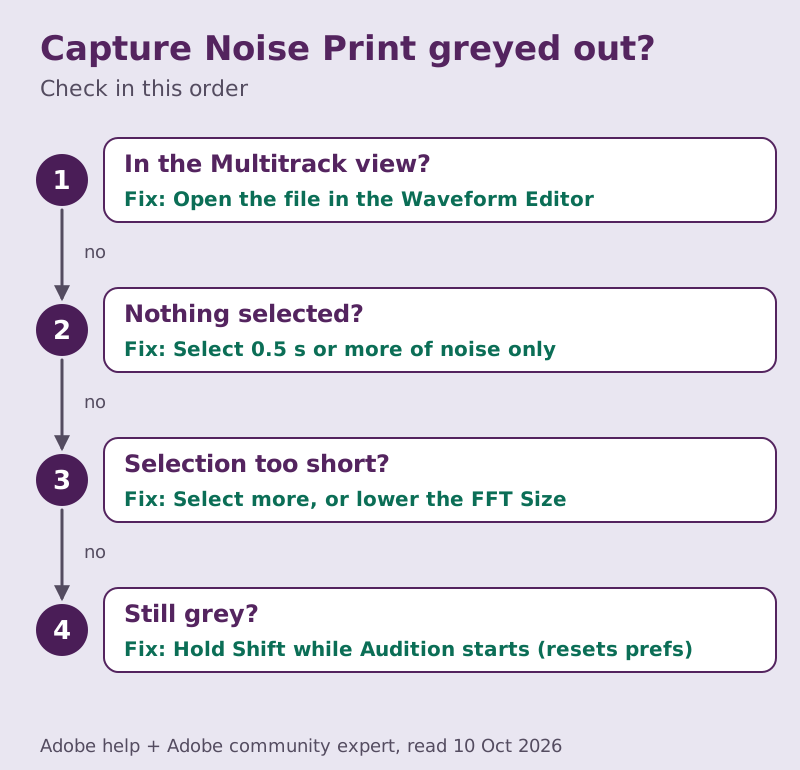
- You're in the Multitrack view. The noise print belongs to the Noise Reduction process effect, which Adobe lists as Waveform Editor only. In Multitrack the command is permanently unavailable. Open the file in the Waveform Editor and it comes back.
- Nothing is selected. In the Waveform Editor the command needs a selection to learn from. Drag across a noise-only stretch first.
- The selection is too short. Adobe says a too-short range disables Capture Noise Print. Select a longer stretch, or lower the FFT Size in the Noise Reduction dialog. If no longer gap exists, Adobe's tip is to copy the noise you have and paste it to make a longer stretch, capture the print, then delete the pasted section.
- Still grey with a selection in Waveform? An Adobe community expert's advice is that the preferences may be damaged. Holding Shift while Audition starts resets it to defaults, which also erases your saved settings, so note any custom presets first. Reinstalling doesn't help, because the preferences folder survives an uninstall.
If you'd rather not work in Waveform at all, Adaptive Noise Reduction needs no print and runs in Multitrack.
Adaptive Noise Reduction and DeNoise for changing noise
Adaptive Noise Reduction removes variable broadband noise such as background sound, rumble and wind. It works in real time, so you can put it in the Effects Rack alongside other effects and use it in the Multitrack Editor without changing the file. Adobe says it identifies the noise from the first few seconds of the selection, so it works best on a selection that starts with noise and then speech. Its key controls:
- Reduce Noise By: Adobe says values between 6 and 30 dB work well; lower values reduce bubbly artefacts.
- Noisiness: the share of the audio that is noise.
- Spectral Decay Rate: too short sounds bubbly, too long adds a reverb-like smear.
- Broadband Preservation: keeps audio in bands near the detected noise; lower settings remove more noise but can make the processing audible.
It needs a lot of processing. If playback stutters, Adobe suggests lowering the FFT Size and turning off High Quality Mode.
DeNoise is the simplest of the set: one slider from 0% to 100% for hum, hiss, fans, air conditioning or other background noise, plus a Gain control because removing noise can leave the output quieter. Output Noise Only lets you hear exactly what it is taking away. Its Processing Focus buttons aim the work at all frequencies, the highs, the highs and lows, the mids or the lows, which helps when the noise sits in one region, such as a low rumble.
Which to choose? Use Noise Reduction when a clean noise sample exists and the noise is steady. Use Adaptive when the noise moves or there is no sample. Use DeNoise when you want a quick, single-slider pass you can judge by ear. The process method is usually the most precise on constant noise; Adobe notes it is sometimes more effective on hiss and hum than Adaptive.
Settings that cause the underwater sound
The watery, bubbly or metallic sound people complain about after noise reduction has a name, musical noise, and in Audition it comes from a handful of settings pushed too far. Adobe's own guidance for the Noise Reduction effect:
- Noise Reduction too high: excessively high levels can make audio sound flanged or out of phase. Back it off from 100%.
- Reduce By too high: values between 6 and 30 dB work well, and lower values reduce bubbly artefacts. If sparkles appear, drop to 6–8 dB and run two gentle passes instead of one heavy one.
- Spectral Decay Rate outside 40% to 75%: below that range you hear bubbly artefacts; above it, noise remains.
- Smoothing too low: raising it (up to about 2) reduces burbly background artefacts, at the cost of a slightly higher noise floor.
- FFT Size too high: settings from 4096 to 8192 work well. Higher sizes remove noise frequencies very accurately but can add swooshing or reverberant artefacts.
- A bad print: if the voice thins, the print probably caught a breath or a word. Recapture it from cleaner noise.
Audition gives you enough precision to hurt yourself precisely. If you've made it worse, undo, lower Reduce By, and accept a little noise. A quiet room tone sounds natural; a gated, sparkling silence sounds edited.
Still noisy? Escalate in this order
- Sparkly artefacts at every setting? The noise overlaps the voice too heavily. Try Adaptive or DeNoise at a gentle setting, or accept some noise.
- A steady 50 or 60 Hz drone? Skip the print and use the DeHummer, as the hum and hiss guide explains.
- Room echo rather than noise? That's DeReverb, a different effect with its own amount slider.
- Noise fine, levels all over the place? You need loudness matching and a compressor, not more reduction.
Quick questions
How do I reduce noise in Adobe Audition?
For steady noise, capture a noise print from half a second or more of pure background in the Waveform Editor, then apply Effects > Noise Reduction/Restoration > Noise Reduction, starting around 80% and 10 dB. For noise that changes, use Adaptive Noise Reduction, which needs no print and also works in Multitrack.
Why is Capture Noise Print greyed out in Audition?
Usually because you're in the Multitrack view, where the noise print workflow doesn't exist, or because nothing is selected. Switch to the Waveform Editor and select a noise-only stretch of at least half a second. If the range is too short, select more or lower the FFT Size.
What's the difference between Noise Reduction and Adaptive Noise Reduction?
Noise Reduction learns your noise once from a captured print and removes it precisely, but only in the Waveform Editor. Adaptive Noise Reduction estimates the noise continuously from the start of the selection, follows noise that changes, and runs in real time in Multitrack. Sample available and steady noise: Noise Reduction. Otherwise: Adaptive.
How do you remove one specific sound from audio in Audition?
Use the Sound Remover effect. Select a stretch that contains only the unwanted sound, click Learn Sound Model, then apply it to the range you want to clean. Presets cover sirens and ringing phones. For a single cough or click, open the Spectral Frequency Display, box the sound with the Marquee tool and press Delete, or paint over it with the Spot Healing Brush.
Why does my audio sound underwater after noise reduction?
The settings are too aggressive. Lower Reduce By (Adobe suggests 6 to 30 dB, lower for fewer bubbly artefacts), keep Spectral Decay Rate between 40% and 75%, raise Smoothing slightly, and recapture the print if it caught any speech. Two gentle passes usually sound better than one heavy one.